For those of you that celebrate, I hope you have a wonderful Easter weekend. And even if you're not a true believer, you may still score a chocolate bunny or marshmallow chicken, so you've got that going for you. Speaking of Easter edibles, for me there's one signature taste and smell that rises above all others; anise-scented Easter bread!
Below you'll see my family's recipe for Italian Easter bread, and if you've never experienced this aromatic, and very addictive sweet bread before, I highly recommend you "rise" from the couch, and give it a try. You can read the original post and get the ingredients here. Enjoy!
I knew better than to expect you guys to wait until next week for this buttercrust pastry dough, after teasing you with its flaky seductiveness during the apple hand pies video. Yes, the audience has spoken, and basically said, “post this before Easter or else.”
As I mention in the clip, you really want to use a food processor for this. You can certainly use a wire pastry blender and do it by hand, but it’ll take a while, and mixing in the ice water is so much easier with whirling blades. I’m not sure I’ve ever achieved that same gorgeous “breadcrumb” texture blending by hand.
If you decide to use this pastry for a savory recipe, I’d suggest cutting the sugar down a bit, but don’t be tempted to leave it out. I used the leftover dough from the apple turnovers video, which had all the sugar, for some duck pot pies, and it was really good, but maybe just a tiny bit sweet.
If you’re going to use this recipe for some Easter pies or brunch desserts, I hope you like the dough as much as I did. Just make sure your butter cubes are frozen, and your ice water is, well, ice-cold water. These are the keys. Do that, and you’ll have a pastry dough that tastes, feels, and sounds fantastic. I hope you give it a try soon. Enjoy!
Ingredients for about 1 pound pie dough (enough for 1 large pie or 4 turnovers):
This Easter-inspired rack of lamb recipe is fairly typical of other dishes I’ve posted with this cut, except for one major difference; we’re actually roasting the meat over the sauce. And not just any sauce; we spiked this beurre rouge (red wine butter sauce) with fresh blueberries, and the small, dark fruit performed beautifully.
My game plan was to introduce some always-welcomed moisture into the cooking environment, as well as hopefully impart some flavor and aroma from the berries, shallots and wine. Both goals were realized, and I was very happy with the final results. Besides possibly straining the cooked berries out next time, I think it was pretty close to spot on.
One word of warning to you poor, unfortunate souls who will insist on cooking this longer: Beside the obvious crime against nature of not eating this pink, you’ll also risk having your sauce dry up and burn in the oven. So, if you are going longer than the 20 minutes recommended here, be sure to check the pan, and add a splash of water if needed.
Other than that, as long as you’re checking with a thermometer, I don’t think there’s a lot that can go wrong. The sauce is very simple to finish up as your lamb rests, and quite similar to most of the pan sauces you’ve seen posted here before. So, if you’re looking for something a little bit usual for your Easter menu, I hope you consider giving this a try…it was berry good! Enjoy!
Ingredients for 4 portions: 2 fully trimmed, racks of lamb (8 bone each)
I’ve been playing around with a new pastry dough, and figured I’d use it as an excuse for a little demo on turnovers, or “hand pies” as the hipsters are calling them. I’ll unveil the new “buttercrust” dough next week, but this particular video is not about the pastry, or the filling, it’s about the fairly basic method for folding and crimping one of these up.
As you’ll see, it’s not exactly a complicated procedure. In fact, I can’t imagine your aunt is going to be too thrilled to know that you’ll be able to now match her crimp for crimp. Once you have the outside down, what goes inside should be the least of your worries.
I went for a very soft, apple-saucy, jam-like filling, which turned out very well, but literally any of your favorite pie fillings, both sweet and savory, will work. If you do make an apple version, and want to really blow some minds, top your filling with a thin slice of sharp cheddar. It’s special. I hope you give this easy technique a try soon. Enjoy!
For 4 Apple Hand Pies:
about 1 pound pie dough, divided into 4
egg wash (1 egg beaten with 2 tsp milk)
granulated sugar as needed
For the apple filling:
2 tbsp butter, browned
2 or 3 green apples
1/4 tsp salt
1/4 cup white sugar
2 tbsp brown sugar
1 1/2 tsp cinnamon, or to taste 1 or 2 tsp of water if needed
I'm back from Arizona after a very relaxing week of golfing, watching baseball, and enjoying gorgeous weather that can best be described as the exact opposite of San Francisco. Hot and dry with just enoughbreeze to carry the smell of grilling hot dogs to my well-lotioned nose. It was great fun, but I’m ready to get back to business.
I’d like to extend a sincere thank you to Anna, who by all accounts did a masterful job of moderating the blog. I know you guys aren’t used to prompt, polite, and thoughtful replies to your questions, but I thought you handled it very well. Stay tuned for a brand new video Monday!
Before all you cardiologists out there start a petition drive to have my channel removed from YouTube, let me add the following disclaimer: These butter-soaked, bourbon-glazed carrots should be enjoyed no more than twice a year.
Okay, now that we got that out of the way, I can go ahead and tell you that this is, in my humble opinion, the greatest, special-occasion carrot side dish of all time. Sweet, savory, and oh so glossy.
And yes, as unreasonable as it sounds, you do need bourbon to make bourbon-glazed carrots. What happens if you just make this recipe and use water instead of the whiskey? You get glazed carrots. Close, but no cigar. By the way, in related news, bourbon also pairs very well with cigars. Anyway, if you’re looking for a stellar, and very shiny vegetable side dish for your Easter celebration, I hope you give these bourbon-glazed carrots a try. Enjoy!
Ingredients for 6-8 Portions:
1 stick (4-oz) butter
2 or 3 pounds carrots, peeled, cut into equal-sized pieces
Some of you might think I’m posting this creamy blue cheese dressing recipe while on vacation, just so I don’t have to answerquestions as to why it took five years for this popular food wish to appear. And, while I don’t have a great answer for that, I do have a “grate” answer.
That’s right, a cheese grater and a wedge of frozen blue cheese is real the secret behind a perfect creamy blue cheese dressing. Not only is crumbling blue cheese a messy operation, but those larger chunks sink to the bottom, and don’t become one with sauce.
Using this technique produces a dressing exploding with the funky goodness of whichever blue-veined cheese you decide to use. I used a Maytag blue cheese, but any of the World’s great blues, like Roquefort or Stilton, will work beautifully. I hope you give this great method a try soon. Enjoy!
Makes about 3 1/4 cups Creamy Blue Cheese Dressing: *Please note: everything in this recipe is “to taste,” so adjust to your liking! 1 cup mayonnaise 1 cup sour cream 3/4 cup buttermilk 1 teaspoon crushed garlic
1/2 teaspoon ground black pepper 1/2 teaspoon dry mustard
1/2 teaspoon salt, or to taste 1/2 teaspoon sugar cayenne to taste 1 teaspoon Worcestershire sauce 4 ounces frozen blue cheese, grated View the complete recipe
I’m excited to announce that I’ll be leaving Monday for Arizona's Valley of the Sun, for a week of baseball, golf, and not working on a video recipe blog. I’ve done a ton of traveling since I started this blog, but never actually gone off-line during any of these “breaks.”
No matter where I’ve gone, or what I was doing, I’d find a few hours late at night to jump on the laptop to catch up on emails, answer blog comments, and crush trolls on YouTube. However, this time I’m planning on going completely “unplugged.”
My friend Anna from Allrecipes.com will be moderating the blog, fielding your questions, and generally keeping an eye on you until I get back. I’m sure you’ll treat her with the same good cheer that you show me, and other than being much less of a smartass, you really shouldn’t notice much of a difference.
Despite my great escape to land of the well tanned, we’ll still be posting two brand new videos this week, including a recipe that’s been one of the most requested food wishes of all time. So, stay tuned for that, have fun while I’m gone, and as always, enjoy!
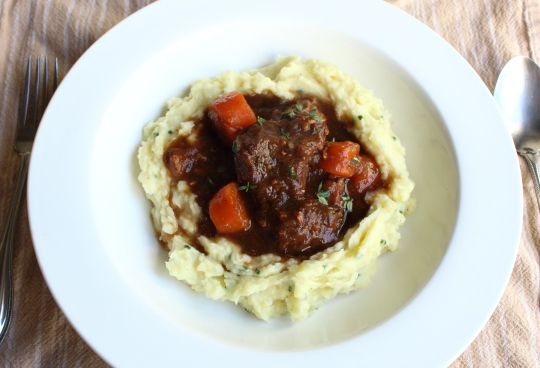
While I’ve never been a huge fan of drinking Guinness, I’ve always been a great admirer of how wonderfully it can elevate a simple beef stew. The subtle bitterness from the hops, and toastiness from the malt, gives the gravy a depth of flavor that I really love.
Besides, you only need one can for this St. Patrick's Day-inspired stew, and since they’re sold in 4-can packs…well, you can do the math. This would normally be the point in post where I’d make my annual Irish drinking joke, but I’m not doing one this year.
Not only is it inappropriate, but it’s culturally insensitive, and I’d like to think I’ve matured past the point of going for such cheap laughs. Besides, my Irish joke writer, Paddy O'Sullivan, was on a binge this week, so I never got one from him anyway. Oh well, like I said, probably for the best.
Anyway, if you’re looking for a gorgeous and incredibly delicious Irish stew recipe for your St. Patrick's Day menu, this one comes highly recommended. I served mine with some green onion mashed potatoes, and while I usually encourage you to serve things like this on whatever you want, not this time. You must serve this with some form of potato. And that is no joke. I hope you give this a try soon. Enjoy!
Ingredients for 4 large servings:
4 strips bacon, sliced into small pieces
2 1/2 lb. beef chuck, cut in 2-inch pieces (tossed with black pepper and at least 1 tsp salt)
2 onions, chopped
1/2 tsp salt
4 cloves garlic, minced
1 can (14.0-oz) Guinness beer, or other dark beer
1/4 cup tomato paste
4 sprigs of fresh thyme
3 carrots, cut in 1-inch pieces
2 ribs celery, cut in 1-inch pieces
2 1/2 cups chicken stock, or as needed
1 tsp sugar
salt and freshly ground black pepper to taste
4 cups mashed potatoes, optional (not really)
- Simmer stew on very low heat, covered, for about 2 hours, or until fork tender
- Uncover, raise heat to med-high, and reduce, stirring occasionally, until sauce thickens to your liking
One of the first things you’re taught at culinary school is how to make an emulsified salad dressing. Of course, we were no longer allowed to call them “dressings,” and had to refer to them by the proper French name, “vinaigrette,” but I knew deep down they were the same thing.
After learning how to spell “vinaigrette,” which I’m still working on to this day, we were set up with bowls and whisks, and shown how to properly achieve the celebrated emulsification. The chefs demonstrated that by slowly dripping oil into vinegar while whisking like crazy, one could magically bond the two elements together.
It took quite a while, and despite a burning shoulder, and cramping forearm, the method did work beautifully. The dressing was perfectly emulsified, and stayed that way. I was impressed. Of course, the next day they showed us how to do the same thing in a blender in 10 seconds, which really annoyed everybody. Why not show us the easy way first?
Well, little did I know there was even an easier way, than the easier way. That’s right, I’m talking about the old “make-n-shake” salad dressing method. By simply shaking vigorously in a small jar, you can create a temporary emulsification that should stay blended more than long enough to dress a salad.
Now let’s be clear, this method should only be used if you are going to eat your salad right away. The good news is, this accounts for roughly 95% of salad-related scenarios. For the rest of the time, when you need the dressing to stay perfectly blended for hours, like on a buffet, you should use the classic method instead.
Anyway, I'd promised to show you the very tasty orange and cumin vinaigrette that we used on our raw kale salad, and I figured it was the perfect excuse to demo this simple salad dressing trick. I hope you give it a try soon. Enjoy!
Ingredients (makes about 3/4 cup):
1 rounded teaspoon Dijon mustard
1 rounded teaspoon orange zest
1 tsp cumin, or to taste
1/4 tsp red pepper flakes, or to taste
1 tbsp fresh orange juice
1/4 cup rice vinegar (or white wine or sherry vinegar)
It would be impossible to pick a “World’s Greatest Dessert,” but if you’re going to have that conversation, the classic crème caramel has to be part of the discussion. When you combine stunning looks with amazing taste and texture, this classic is hard to beat. The way the almost-burnt caramel layer gets fused on, becomes one with, the creamy custard is nothing short of magic. Crème brulee gets more press, but people that know, know.
If my plea for you to use crème fraiche goes unheeded, yes, heavy cream will work here, but the subtle tang and nuttiness you get from the fermented cream takes this to places the regular stuff just can’t. It also seems to add some extra smoothness to the texture, and make no mistake; the mouthfeel with this classic is just as critical as the flavor.
I’ve not tested my theory, but other substitutions like buttermilk and sour cream should also work similarly. If you don’t have Grand Marnier, just using vanilla is fine, but the vague scent of orange rind that it provides the custard is really nice.
You also have the freedom to change the size and shape of your ramekins. Whether you use fewer, larger ones, or a larger number of smaller-sized ramekins, the procedure will work exactly the same. Of course, you’ll have to adjust the cooking times, but the “just set” doneness test will be your ultimate guide. I hope you give these classic treats a try soon. Enjoy!
Ingredients for 4 (6.5 oz) Crème Caramels:
*Scant 1/2 cup sugar, melted over medium heat until a dark caramel forms (just a tad less than a full half cup)
Thanks to my Catholic upbringing, I’ll always associate Friday with fish (and guilt, but mostly fish). It was usually a piece of fried haddock, and as far as sauces go, you only had two choices: tartar or cocktail sauce.
It’s not quite spring yet, but this young man’s fancy has already turned to love. No, not that kind; I’m talking about my love for this ultra-easy, and gorgeously colored, cream of asparagus soup recipe. For me, asparagus is one of those rare vegetables that shines brightest when enjoyed in soup form.
Don’t get me wrong, I love the fresh spears, and have posted many recipes featuring them, but for pure asparagus goodness, you just can’t beat a perfectly made bowl of soup. There are no tricks or secret techniques here; just make sure your onions are fully cooked before adding the asparagus, and other than not over-cooking it, there’s not a lot that can go wrong.
Testing the vegetable’s doneness by pressing them against the side of the pot should eliminate any guesswork, but if unsure, err on the side of slightly under vs. slightly over cooked. The other decision you’ll have to make is whether to strain or not. I recommend it, but totally understand if you don’t. The soup is great as is, but straining out the woodier fibers does give it a finer, more velvety texture.
Of course, the float of Parmesan and lemon cream on top is optional also, but pretend it isn’t. It adds a great visual element, and adds a little extra richness to the soup’s lean, green goodness. I hope you fall in love with this soup soon. Enjoy!
Ingredients for about 1 1/2 quarts of soup:
2 tbsp butter 1 diced onion
2 pounds asparagus
salt to taste
4 cups chicken broth
2 cups water
cayenne to taste
freshly ground black pepper to taste
pinch of nutmeg (I forgot to mention in video, but just add with other spices!)
It’s not often that I post a video for an alternative method on a classic recipe before I’ve actually shown the real deal, but that’s what we have with this incredible baked mushroom risotto.
I was playing around with a baked paella recipe, and began wondering what would happen if I used a similar method for doing risotto. As you’ll see, the beginning and the end of the recipe are pretty standard, but we’ve taken the middle 15 minutes and moved it into the oven, in an attempt to eliminate those dreaded “variables.”
The size, shape, and thickness of your pan, how fast you add the liquid, and how high your heat is are factors that can wildly affect the outcome when done on the stovetop. By using the oven for the majority of the cooking, we don’t have as many things to worry about.
Of course, you still need to finish this thing off yourself, and taste and test for doneness and seasoning, but that goes for any recipe. The goal is to have the rice come out of the oven between 80-90% cooked, so that all it takes is a final addition of liquid, and a few minutes of stirring to recreate that signature “sauce” that makes this dish so famous.
I used a variety of risotto rice called “Carnaroli,” which is known as "the king of rices.” Thanks to a higher starch content and slightly longer grain, Carnaroli produces a beautifully creamy sauce, while still maintaining a firm, toothsome texture. You should be able to find it fairly easily at those fancy grocery stores, but if not, it’s readily available online.
If you end up using Arborio rice, the most popular variety sold for risotto, I’d suggest checking this after 10 minutes in the oven, as I suspect it will cook slightly quicker than the Carnaroli. Besides, you can always cook it an extra few minutes at the end. As many of us have learned the hard way, you can’t un-cook something.
Besides being easier and more repeatable, this method produced a risotto that was identical in looks, taste, and texture to anything I can do on the stove. Having said that, I enjoy standing at the stove making risotto the traditional way, as it’s one of the best meditations ever, so it will be interesting to see which method I use the next time I’m craving the dish.
Anyway, whether you’ve always been afraid to try risotto, or you’ve mastered it and are just curious, I hope you give this a try soon. Enjoy!
Ingredients for 4 portions:
3 tbsp butter
3 cups diced mushrooms
1/2 yellow onion, diced
salt and pepper to taste
cayenne to taste
1 cup Carnaroli or Arborio rice
2 1/2 cups chicken broth, plus more if desired
1/2 cup cream, plus a few tablespoons to finish
1/2 cup finely grated Parmigiano-Reggiano (don’t use that fake crap)
I was playing around with some pulled sugar for an upcoming dessert video, and it reminded me just how much I dislike those ever-popular, themed cake battles on the food networks. In case you've never seen one, I thought I'd take a little break and describe what happens...in every episode: "Contestants, please make a cake that looks like a working Victorian merry-go-round...if his pulled sugarbreaks, the entire design will collapse... he's almost to the judge's table... it's starting to wobble... [BEEP]... well, that's a real shame."
I wouldn’t exactly call this baked lemon pepper salmon a failed experiment, as the cooking method shown herein is a very useful tool in the ongoing battle against boring salmon; but my attempt to fuse lemon and pepper flavor onto the surface with a quick pickling suffered from lack of sweetness.
Such is cooking. Live, learn, and occasionally eat too tart and peppery salmon.Anyway, every time we’d post one of our broiled salmon recipes, I’d getemails from people without broilers asking how they can get the same results, so I figured my little trial by acid would make for a good excuse to show how easy baked salmon is.
As long as you get your oven nice and hot, and aren’t afraid to poke the fish with a fork to check, you should be enjoying tender, moist, flaky meat every time.You can always cook it more, so check after 10 minutes and go from there. If you test in the filet's natural seams, the evidence of your breaking and entering will hardlybe noticeable, and easily covered by a sauce or slice of lemon.
If you use my recipe, you may want to adjust the pepper and acidity of the lemon with something on the sweet side. Pretty much any kind of glaze or marinade will work with this easy technique, and many of them (most of them) will look better than this. I hope you give this a try soon. Enjoy!
Ingredients for 2: two 8-10 oz center-cut salmon filets, boned, skin on
2 tbsp lemon juice
1 tbsp black pepper
1 tsp miso paste
2 tsp mustard
1 1/2 tbsp mayo
cayenne to taste
salt to taste
*Next time I’ll add some Hoisin sauce or something sweet to balance the flavors better. Bake at 450 degrees F. 10-15 min or until done. View the complete recipe