This amazing bacon, green onion, and cheddar corn pancakes recipe was originally planned as a “breakfast for dinner” post, but when I tasted how incredible they came out, I decided to do them as a Father’s Day brunch special instead.
I realize Father’s Day Brunch isn’t actually a thing, but just in case it becomes a great tradition someday, I figured I’d get this into the search engines nice and early. Plus, I really wanted to call them “mancakes.”
Sweet/savory hybrids can be tricky sometimes, but I think this worked beautifully. We are talking about bacon, cheese, and onions after all, so it wasn't that big a shock. And the way the chipotle-spiced maple syrup brought everything together was a risk well rewarded.
As far as the texture goes, these were surprisingly tender, and fairly light for corn pancakes. My only regret is not cooking extra bacon to top these with. So, why not surprise the man in your life, and whip up a batch of these soon? Enjoy!
Ingredients for about 12 Mancakes:
8 oz bacon
1/2 cup thinly sliced green onions
1 1/4 cups all-purpose flour
3/4 cup cornmeal
1 tbsp baking powder
pinch freshly ground black pepper
pinch cayenne
3/4 tsp salt
2 large eggs, beaten
2 tbsp melted butter
1 tablespoon sugar
1 1/3 cups milk
2 oz grated sharp cheddar (about 1/2 cup)
serve with warm maple syrup spiked with chipotle to taste
After the ominous, but delicious, “Hangtown Fry,” Original Joe’s “Joe’s Special” is probably San Francisco’s most famous breakfast. Unless you’re counting the Buena Vista Café’s Irish coffee as breakfast, and now that I think about it, you probably should.
This mammoth plate of food features three eggs, a half-pound of meat, and more than enough spinach. Apparently a late-night patron requested his spinach omelet include a hamburger patty, and this is what happened. In respect to good ol’ made-up “Joe,” I’ve kept the original portions, so feel free to share with a friend or three.
Speaking of mammoth, this should make all you paleo-diet people who keep emailing me happy. Skip the toast and you’re in high-protein/low-carb heaven. As far as the method goes; even a caveman could do it. Just be sure to season generously at each stage, and taste at the end, and you’ll be enjoying a truly delicious, San Francisco original. Enjoy!
Ingredients for one huge portion: NOTE: This version is mostly meat and spinach, but if you want something closer to a classic scramble, then cup the beef and spinach amounts in half. This is how most restaurants that copy the recipe do it!)
1 tbsp olive oil
1/3 cup diced onion
1/2 cup sliced mushrooms
8 oz lean ground chuck
salt and pepper to taste
1/2 to 3/4 cup chopped, cooked spinach, squeezed very dry
I don’t often buy puff pastry to make asparagus tarts, but when I find a piece in the back of the freezer, it’s one of my all-time favorite things to do. My only real regret with this video, was not finishing it with a poached egg, and calling it a Mother’s Day brunch special. As great as this was, it would have been even more so accessorized with a runny egg.
As long as you’re pretty good at making rectangles, and trimming things to the right length, this recipe is a breeze. By the way, I’ll give the specific ingredient amounts I used here, but this really depends on how much asparagus you have, and how long you want your tart to be.
The width of your tart is always going to be a little wider than the asparagus are long, as you see above; but the length is up to you, and you can use as many spears as will fit across your pan. If you’re not quite clear on what I’m saying, simply Google “asparagus tart” and you’ll see what I mean. They’re like snowflakes.
While we got a surprisingly positive response on our raw asparagus salad recipe (I really should have more faith in you), I did want to do a more classic, hot preparation as well. Asparagus is bountiful and beautiful right now, and I really hope you pick some up, possibly along with some eggs, and give this a try soon. Enjoy!
freshly ground black pepper and cayenne to taste - Bake puff pastry shell at 400 F. for 10-12 minutes, or until puffed and golden-brown. - Fill and bake another 10-12 minutes or until the pastry is browned and asparagus are tender (but not mushy!).
This recipe video is inspired by a Lebanese yogurt cheese spread called Labneh, but I decided to call it homemade cream cheese because my sources deep inside Google tell me that “cream cheese” is searched for more often than “labneh.” In fairness, and with apologies to my Lebanese fans, it really is almost identical in texture and mouthfeel.
Like I say in the video, the taste is a bit bolder and tangier than that stuff from Philly, but when is that ever a bad thing? Michele found some amazing sheep’s milk yogurt at a local farmer’s market, and it was incredible in this, but I've used regular yogurt and it works wonderfully as well.
You can use it as you would any commercial cream cheese, but the honey and pistachio variation I tacked on to the end would make for a memorable holiday brunch addition. On the savory side, you can’t beat simply drizzling over some olive oil and eating as a spread with crispy bread or pita chips.
Most recipes for this say you can eat it after one day, but I really think the two-day “aging” and pressing process does great things. The taste mellows out a bit, and the texture gets even denser and richer feeling. Besides, if you don’t press it, you won’t get those signature, and ultra sexy cheesecloth fabric marks! I hope you give this homemade cream cheese a try soon. Enjoy!
Ingredients for about two heaping cups of cream cheese:
1 quart yogurt, try to get something really nice from a dairy, or use Greek-style
1 tsp kosher salt or to taste
cheesecloth *If needed, use a paper towel to blot off any additional moisture that come to the top during the 2-day pressing in the fridge.
Note: I’ve only made this one way, so I’m not sure what happens if you deviate from the recipe and use low-fat yogurt, etc. Let me know if you try something different!
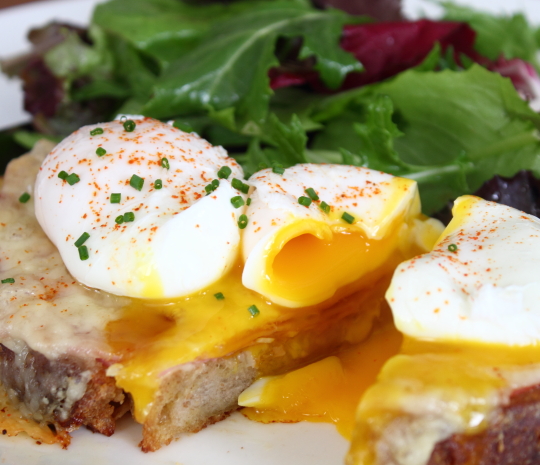
I always get a ton of food wishes this time of year for creative brunch ideas, and I was thinking about doing some new type of eggs Benedict, when I happened to see a photo of a Monte Cristo sandwich. At first, it just made me want a Monte Cristo sandwich, but after that wore off, I started thinking about how I’d seen these topped with fried eggs before.
Long story short, I decided to simply make an open-faced version of the famous stuffed sandwich, and top it with poached eggs, and hopefully a new American brunch classic was born. Of course, I'll let you decide, but there was nothing I didn’t love about this plate of food. Okay, the salad was kind of phoned in, but the rest was awesome.
The base is a variation of our famous Restaurant Style French Toast recipe, which marries perfectly with the ham, cheddar and havarti. It was so tasty you really don’t even need the poached eggs. Actually, forget I said that. Do the eggs. If only so you can pop those yolks, and watch them run. Besides the eating, that has to be the best part.
I’ve also re-posted a poached eggs demo below, since poaching your eggs ahead of time is the only way to go, especially if you have a larger group. By the way, you can hold the Monte Cristo bases in a warm oven while you pull the rest of the meal together. I hope you give this new Benedict a try soon. Enjoy!
Breakfast items are one of the most popular food wishes around here, and while this isn’t technically a recipe, it is a critical technique to learn if you want to enjoy blueberry pancakes at their most delicious.
Not only does this simple method ensure even distribution, but instead of dry, barely warm fruit, your blueberries will be hot, sweet, and bursting with juice. As far as the batter goes, you are on your own, but if you get stuck, try this old fashioned pancake recipe we posted a few years ago. It gets great reviews!
This video was actually inspired by a recent visit to a diner where I heard someone nearby order blueberry pancakes. That sounds pretty good, I thought to myself, momentarily regretting my corned beef hash decision. Well, good thing I stuck with the hash, as what came out was not blueberry pancakes, but pancakes with a handful of fresh blueberries tossed over the top.
Sorry, but those aren’t blueberry pancakes. No, the blueberries must be cooked inside the batter…but, just not too inside. By “throwing down” you’ll guarantee perfect cake/fruit integration every time. Of course this will work with other berries or cut up fruit, so feel free to try with anything you can grip. I hope you give this great technique a try soon. Enjoy!
To all of you that have been requesting mini-cupcake videos: this mini quiche recipe may be as close as I get. I’m sorry, but it’s hard for me to get excited about buttercream when I have chorizo, potato and manchego in the house. Okay, one’s a sweet treat and other is a savory snack, so it’s not a fair comparison, but on the bright side, this intro paragraph is done.
This little baked bite is very loosely based on the Spanish Tortilla, and not only is it dead simple to make, but the versatility of the technique allows this to be adapted to any occasion. From ruckus Super Bowl celebration to black tie Oscar party, these mini quiches will always be a crowd-pleaser.
I’d almost be insulted if you didn’t make changes to the ingredients to tailor this to your tastes, but I do recommend that little dab of aioli on the top. I spiked a classic, garlicky aioli with some smoked paprika and chive, and it really made these treats even more special. I hope you give them a try soon. Enjoy!
Ingredients for 24 Mini Quiche:
4 oz Spanish chorizo sausage, small dice
2 tsp olive oil
1 russet potato, small dice
salt and pepper to taste
vegetable spray, as needed
8 large eggs, beaten with pinch of cayenne and 1/2 tsp salt
(Note: there are 10 eggs shown in the video, but it made too much, so I cut down to 8)
When I was asked to take part in a special holiday YouTube playlist called, “Christmas Morning Breakfast,” I started thinking about seasonal variation on things like eggs benedict, quiche, and French toast. But then I realized…you can’t wrap those things up and give them as an edible gift, so I decided to do this granola instead.
We’ve covered the edible gift topic before, and discussed the fine line between, “Wow, what a creative and thoughtful gift!” and “Wow, what a cheapskate!” Happily, when it comes to this delicious, crunchy treat, one taste and the lucky recipient will forget about any ulterior economic motivations.
Since this was a Christmas-themed recipe, I went with lots of festively colored dried fruit, but the beauty of the granola technique is that it pretty much works with anything. I love the looks of the green pumpkin seeds, but things like hazelnuts and pecans would also work wonderfully.
As I mentioned in the video, it’s really up to you to determine the cooking time. I tend to like mine just golden-brown, but many enjoy the deeper, nuttier flavor of a longer roasting. Since you are pulling and tossing every 10 minutes, this is pretty easy to monitor, but just be careful towards the end, as it can get bitter if you go too far.
Anyway, whether this is for a quick and easy holiday breakfast, with milk or over Greek yogurt; or you are going to package some up as a stocking stuffer for the foodies in your life, I hope you give this a try soon. Enjoy!
Ingredients for about 6 cups of Granola
3 cups rolled oats 1 cup sliced almonds 1/2 cup raw pumpkin seeds 1/2 cup shredded coconut (pure coconut, not candied)
3/4 cup packed brown sugar 1/2 cup maple syrup 3 tbsp vegetable oil 1 tsp salt
1/2 cup chopped candy covered chocolate pieces (like M&M’s)
1/2 cup golden raisins, chopped
1 cup mixed dried fruit (any combo of cranberries, cherries, strawberries, blueberries, etc.)
*Bake at 325 degrees F. for 30-40 minutes or until browned.
I have no intention of giving up the best job in the world anytime soon, but if I do, I’d try and get a job in the marketing department of a pumpkin puree company.
I’m guessing that like 97% of the canned pumpkin in this country is used during the time from Halloween until Thanksgiving. So if I could figure out a way to get people to use this in recipes all year round, I’d be a total superstar in pumpkin puree marketing circles.
Imagine that. It would be…awesome? Anyway, maybe I should rethink this whole post-Foodwishes career path, but in the meantime, here’s just one example of how I would convince the public that pumpkin is great for anytime of the year. Ironically, I did this because I had leftover pumpkin from Thanksgiving, but still.
I may have covered this in the last scones post, but I’ve never been a huge fan of the scone. I’ve always considered it some sort of effeminate biscuit, but I’m starting to come around in my old age. There’s nothing like a freshly baked scone with a steaming hot cup of tea or coffee, especially one tricked out with pumpkin, toasted pine nuts, and maple glaze. I hope you give this a try soon…or anytime! Enjoy.
Ingredients for 12 Pumpkin Scones:
8 ounces by weight all-purpose flour (about 1 3/4 cups)
1/4 cup white sugar 1 tbsp baking powder
1/4 tsp baking soda 1/4 teaspoon salt 6 tablespoons unsalted butter 1/3 cup toasted pine nuts
1/2 cup pumpkin puree 1/3 cup buttermilk
additional flour as needed 1 egg beaten with a few drops of milk or water to brush scones before baking.
When I was asked to join some of my fellow foodies on YouTube, to produce a video for a special seasonal playlist called “Halloween Sweet Treats,” I sat down and considered all thescary sweets recipes in my repertoire. After several minutes of deep thought, I realized I had nothing.
Not to sound like a curmudgeon, but sticking broken pretzels into a marshmallow and calling it a “scary spider,” just isn’t my thing. So, instead of trying to figure out how to make a chocolate truffle look like a bleeding eyeball, Imade a batch of pumpkin cinnamon rolls. They may not be scary (what’s the opposite of scary?), but they are seasonal, and incredibly delicious.
I used to joke that when Halloween/Thanksgiving time rolls around, the only thing a chef has to do to make a recipe seasonal is to add some pumpkin to it. Chili with a spoon of pumpkinstirred in? Halloween chili! Dinner rolls with a spoon of pumpkin kneaded into the dough? Thanksgiving dinner rolls!
Well, that’s exactly what I did here, and while it may be formulaic, it also produced the best cinnamon rolls I’ve ever tasted. One key is a nice soft, sticky dough. Be sure to only add enough flour so that the dough just barely pulls away from the side of the bowl as it kneads.
You can certainly embellish by adding some chopped walnuts or pecans to the cinnamon-sugar layer, but since I decided to garnish with pumpkin seeds, I went sans nuts. Anyway, despite not being very horrifying, these really would make aspecial treat at any Halloween party. I hope you give these a try soon. Enjoy!
Ingredients for 16 Pumpkin Cinnamon Rolls:
(I used a deep 13 x 9 baking dish) Bake at 350 degrees F. for 30 minutes
For the dough:
1 package of dry yeast
1/4 cup very warm water (about 100-105 degrees F.)
1/2 tsp white sugar
1/2 cup pure pumpkin puree (not pumpkin pie filling)
1/4 cup heavy cream (can sub milk, but cream is better)
1 tsp fine salt
1/4 cup melted butter
1/2 tsp vanilla extract
3/4 tsp pumpkin pie spice (or 1/2 tsp ground ginger and 1/4 tsp allspice)
1 large egg
1/4 cup granulated sugar
3 to 4cups all purpose flour (divided), as needed (add enough flour to mixer so that dough just barely pulls away from sides, and a very soft, slightly sticky dough is formed)
*knead for at least 6-7 minutes
For the filling:
5 tbsp melted butter, brushed on rolled dough
3/4 cup packed brown sugar
1/4 cup of granulated sugar
2 tbsp ground cinnamon
*For the glaze:
1/4 cup room temperature cream cheese
1 cup powdered sugar
1/4 cup milk, or as needed
1/4 tsp vanilla extract, optional
*adjust glaze by adding more powdered sugar or milk to achieve desired consistency
After using Merguez sausage in this beautiful stuffed acorn squash recipe last year, I got a bunch of emails saying, “I can’t find that anywhere! Can you show us how to make it?!” I generally ignore those, since it’s usually just people not looking hard enough (I’m looking at you, Mr. “I can’t find Panko”).
However, in this case, I realized that Merguez is not commonly stocked at the grocery store, so I decided to come up with an easy home version. I didn’t bother with the casing, as these were originally going to be breakfast patties, but as I mention in the video, I was seduced by a brioche roll, and ended up going full burger. Happily, it made for a very memorable lunch.
If you do happen to give this Merguez recipe a try, I hope you make a double batch and not only experience the amazing burger it produces, but also use it in/on a number of things. It is wonderful in beans, frittatas, pastas, soups, and especially crumbled on pizza or flatbread. I really hope you give it a try soon. Enjoy!
Ingredients for Four (4 oz) Patties:
1 pound ground lamb (rec., 85% lean, 15% fat)
1 tsp salt
1 tsp cumin
1/2 tsp cinnamon
1/2 tsp coriander
1/4 tsp fennel seed 1/4 tsp turmeric
3 cloves garlic
2 tbsp Harissa (a spice red pepper paste), we did a version here. I didn’t add cayenne since my Harissa was very spicy, but feel free.
1 tbsp tomato paste
*Note: To check seasoning, fry a small piece and check for salt and heat. View the complete recipe
Someone asked recently, what's the most requested recipe that I've still not done on the blog? That's an easy one...cinnamon rolls or buns!
I'm not exactly sure why these sweet, sticky treats haven't made an appearance yet, and I'm sure they will eventually, in one form or another, but in the meantime I'd like to present this very sexy version from my friends at Allrecipes.
One of my earliest and fondest food memories is that of my grandfather making frittata. It wasn’t the taste of this hearty, Italian omelet that made such an impression, although that was always wonderful, it was the excitement surrounding “the flip.”
Traditionally, a frittata is cooked about three-quarters of the way, flipped over on to a plate, and slid back into the pan to finish cooking the other side. It’s an hot, slippery exercise fraught with danger, and more than one of his magnificent creations ended up a broken mess. Come to think of it, this is where I first learned how to curse in Italian.
The funny thing is, as long as you have a broiler to finish cooking the top, which he did, you don’t need to flip anything. Just pop it in for a few minutes to firm up the eggs, and brown the cheese, and you’re ready to eat. So, why did he insist on the always risky flip-n-slid?
I’m not exactly sure, but I imagine it was because his father flipped frittatas, and so did his grandfather. That’s just the way they were done, so that’s how he did it. Regardless whether you’re flipping or not, this rustic egg pie was invented for late summer’s vegetable bounty.
If you can fry it in olive oil, it tastes great in a frittata, especially leftover vegetables that would otherwise end up in the trash. It’s also amazing with any kind of summer squash. Just remember that the veggies need to be tender before the eggs go in, since they cook so fast. I hope you give this “memorable” recipe a try soon. Enjoy!
Ingredients for 4 servings:
12 large eggs
1 tbsp olive oil
6 slices of bacon or pancetta
1 1/2 cups sliced peppers
1 1/2 cups cubed, cooked potatoes
OR about 3 cups of any summer veggies
dry or fresh herbs to taste
salt and pepper to taste
hot pepper flakes to taste
2 oz crumbled feta cheese
*Remember to drain oil before adding potatoes and eggs!
If you’re wondering why I called this recipe “baked eggs with eggs,” I didn’t. No, “huevos” has another meaning, and any of your Spanish-speaking friends will be happy to tell/show you what that is. Anyway, as I said in the video intro, don’t let the generic name fool you; this “baked eggs” recipe is way more delicious than it sounds!
If you enjoy huevos rancheros, you will love this. The way the spicy sauce mingles with just barely set eggs is very similar, and when you start scooping this up with toasted chunks of bread, it gets borderline magical.
If you happen to accompany this humble dish with copious amounts of ham and bacon, this would make for quite the Father’s Day treat. You can stay with my Italianesque version, but American, Latin, or Asian versions are only a couple tweaks away.
I gave a general time of about 12 minutes at 400 degrees F., but of course this is going to vary based on your exact dish size/shape, as well as how many you are making at once. I would start checking after 10 minutes, keeping in mind that the yolks will keep firming up even after they are out of the oven.
Anyway, whether you are trying to impress dad with your brunch skills (by the way, don’t call it brunch if it’s for Dad…go with “breakfast”), or simply want to shake up your personal egg recipe routine, I hope you give this a try soon. Enjoy!
Ingredients for 1 Portion:
Shallow oven-proof dish, just large enough for 2 eggs 2 large fresh eggs
There are so many food-related ways to show mom love this Mother’s Day weekend, but none will be more delicious than this creamy quiche Lorraine! What are your plans?
Breakfast in bed? Great idea, until you consider the crumbs and numb legs. Maybe brunch out? Sure, less clean up, but a mediocre meal at the local casual dining complex says, “we like you, mom,” more than it says, “we love you.”
That brings us to the best option; cooking brunch for mom at home. Of course you’ll need something that’s very easy to make, even ahead of time if need be, as well as supremely special and memorable. This cheesy, bacon and onion pie is all that, and more!
In this chef’s opinion, a proper quiche should be rich, custardy, and luxurious – not some kind of dense, baked omelet. This has only enough eggs and yolks to hold things together, but that means you need to let it cool to just warm before serving, to fully enjoy the experience.
I know many will ask, so I’ll cover it now… yes, of course you can just use milk instead of cream, and more whites instead of yolks to cut down on the calories, BUT you will not get the same amazing results, and since this is such a special occasion, you should give any substitutions careful consideration.
As you’ll see, this is very simple, so the challenge isn’t construction (by the way, the layering procedure wasn’t a joke…do it), the real trick it to not overcook the custard. I show you what it should look like, but in case you aren’t great at reading jiggles, use a thermometer, and pull at between 160-165 degrees F. internal temp.
Anyway, I’d like to wish my mother, and first culinary instructor, Pauline, a very happy Mother’s Day. Unfortunately we can’t be together Sunday, but I promise I’ll make quiche for her the next time I see her. I’d also like to wish my mother-in-law, Peggy, a happy Mother’s Day. She was the original Food Wishes fan (even before it was called “Food Wishes”), and was integral to the blog’s growth and success! Thanks, moms! Enjoy!
Ingredients: Pie dough for a large, single-crust, deep dish pie dish or pan (click here for recipe!)
8 slices bacon, cut into 1-inch pieces
1 cup (I used a little more) diced leeks (just white/light parts) and/or onions, washed extremely well! big pinch of salt
cayenne and freshly ground black pepper to taste
6 ounces shredded Gruyere cheese, divided (or other Swiss cheese)
For the custard:
3 large eggs, plus 2 additional egg yolks
1 cup cream
3/4 cup milk
1 tsp chopped fresh thyme leaves
Steps:
- Line inside crust with foil, fill halfway up with dried beans, rice, or baking weights
- ”Blind bake” the crust for 5 minutes at 425 degrees F.